1. 背景:混乱的 API
Unity 2023+ 的版本实现 XR 后处理有一些挑战,主要是历史遗留问题。
RT有三套 API:
- RenderTexture
- RenderTargetIdentifier
- RTHandle
SetRenderTarget有四个:
- CoreUtils.SetRenderTarget
- ScriptableRenderer.SetRenderTarget
- CommandBuffer.SetRenderTarget
- Graphics.SetRenderTarget
Blit 有五个:
- Graphics.Blit
- CommandBuffer.Blit
- ScriptableRenderPass.Blit
- RenderingUtils.Blit
- Blitter.BlitTexture
问题来了,哪些 Unity 2023+ 能用?哪些 XR 能用?真的让人头秃。
Github 上很多代码版本比较老,都无法直接使用在 URP + XR 条件下,因此需要一些特殊的技巧移植代码。
2. Single-Pass Stereo Rendering
这是一种 XR 设备中目前比较主流的渲染技术,在 Unity 官方文档中有所描述,但不太形象。
https://docs.unity3d.com/2023.1/Documentation/Manual/SinglePassInstancing.html
一般 VR 设备有两块屏幕(左右眼),两眼有视差,因此双眼所见内容并不完全一致。
如果两个屏幕的内容分开渲染会有一些浪费,因为二者的几何数据是一致的。
Stereo Rendering 的简化是:两个屏幕一起用 Instancing 的方式渲染,左右有相同的几何数据,而只是 View Matrix 有所不同。
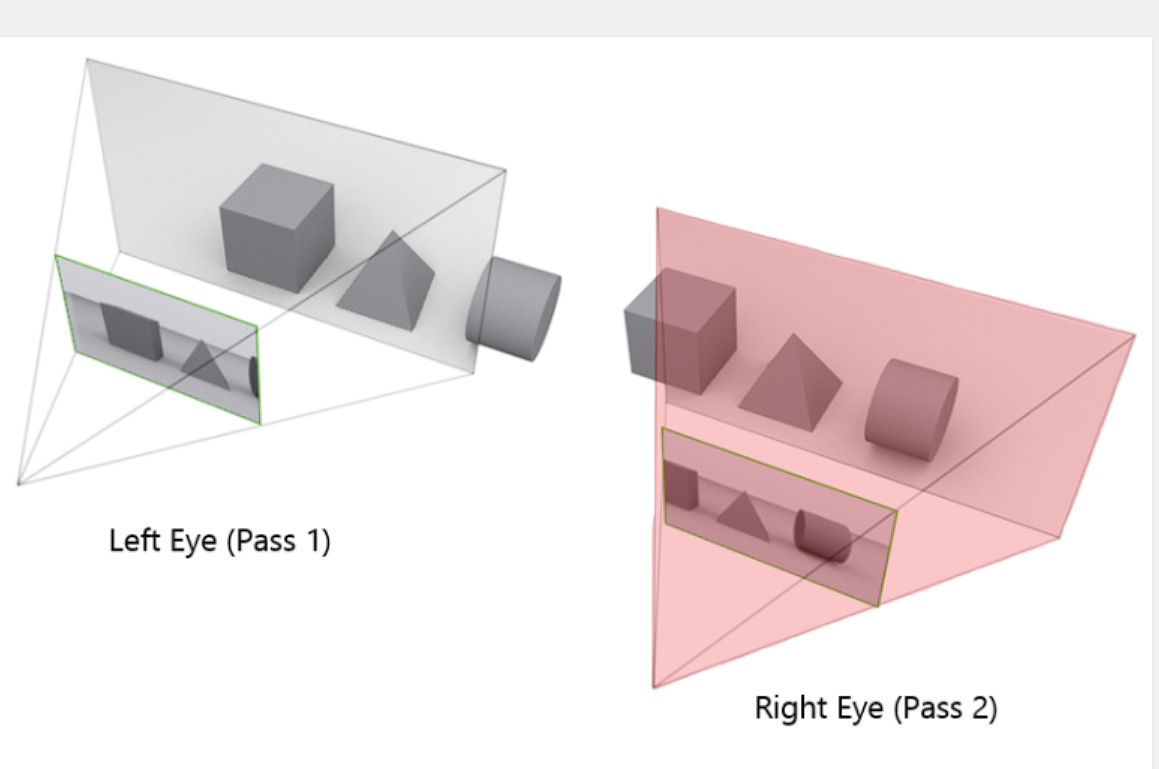
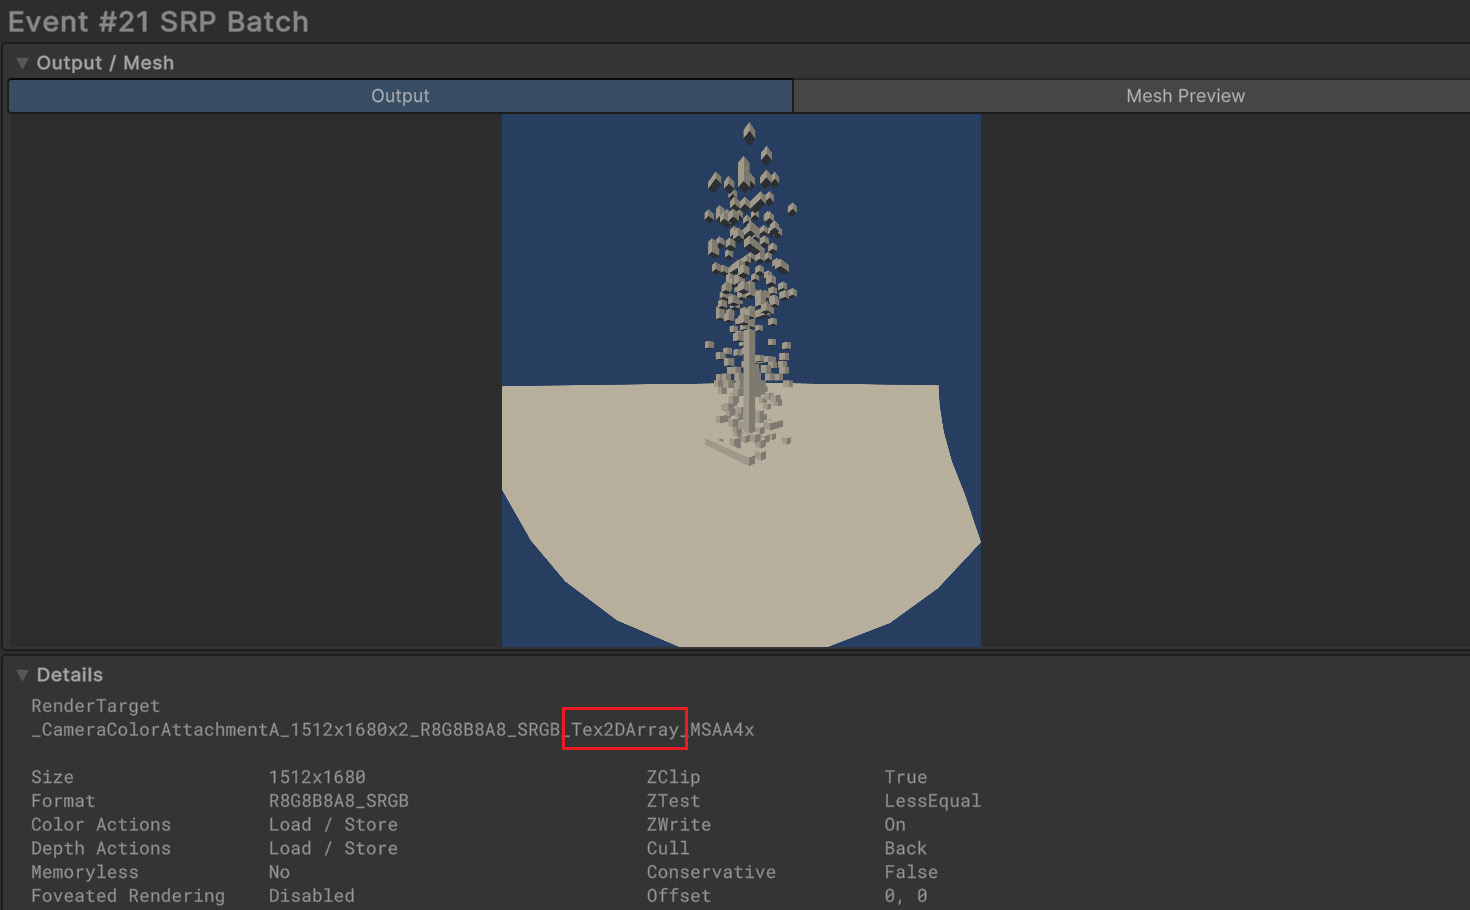
对我们实现 Custom Render Feature 的影响时,这时候 RenderTarget 实际上是一个 Texture2DArray!Array中有两个 ID,分别对应左右眼。
从 Frame Debugger 中也可以看到,uniform buffer 放的数据有两个 matrix,分别对应双眼。

可以想象,API 调用的 DrawMeshInstanced,在 shader 内部按 instanceId 选择 matrix 计算 v2f,之后在 fragment shader 中按照 stereo id 拿到需要的顶点数据。
因此,在 XR 模式下,Shader 的写法,Blit 的方式等都必须要特殊处理,不然无法在Stereo Rendering 模式下工作,这也是 XR 模式下,很多古老的代码挂掉的原因。
3. API 到底用哪个
个人的一个简单的结论是:用 RTHandle,CoreUtils.SetRenderTarget 和 Blitter.BlitTexture。主要是观摩学习了 URP 官方代码,然后自己测试下来能跑就行。也不不排除别的 API 能用。但有些 API 是肯定用不了了。
官方原文
1 | Avoid using the CommandBuffer.Blit API in URP projects. |
总之就是说 commandBuffer.Blit 在 XR 跑不了,然后依赖于这个 API 的也不行。
3.1 RTHandles
最早 builtin 管线中,大多数时候需要手动分配 RenderTexture 并自行绑定。后面 Unity 引入了 RenderTargetIdentifier 系统,对 RT 做了一些抽象。而在 Unity 2022 / URP 13 中,这套Identifier 直接被废弃了,改为使用新的 RTHandles 系统。可以详见这个 2021年11月的 PR
https://github.com/Unity-Technologies/Graphics/pull/5346
一些 API 如 SetRenderTarget,Blit 等只能接收 RTHandles,一些古早的代码会直接无法使用。这个也是官方比较推荐的 RenderTexture 使用方式。
正确的使用方式:
- RenderPass 初始化时,使用 RTHandles.Alloc(),这时可能还没有实际分配 RT,只是给了个标识符。
- void Execute(ScriptableRenderContext context, ref RenderingData renderingData) 方法中使用 RenderingUtils.Reallocate 。 这个方法内部比较了 RenderTextureDescriptor 是否有变化,如果需要的话会自动重新创建 RT
- RenderPass Dispose 时 RTHandle.Release()
3.2 CoreUtils.SetRenderTarget
1 | void SetRenderTarget(CommandBuffer cmd, RenderTargetIdentifier buffer, ClearFlag clearFlag, Color clearColor, int miplevel = 0, CubemapFace cubemapFace = CubemapFace.Unknown, int depthSlice = -1) |
这个方法有 26 个重载方法,可以设定 color buffer, depth buffer, load action,store action,clear color 等等很多,就不一一叙述了,以上是几个常用的。读者可以自行阅读源码学习。
3.3 Blitter
总之是使用 Blitter 类。
1 | // 以下会自动先设置 RenderTarget,再执行 Blitter.BlitTexture |
读者可以自行阅读源码学习。
早先一些的版本中,官方建议用 cmd.DrawMesh 画一个全屏方块,如 https://docs.unity3d.com/Packages/com.unity.render-pipelines.universal@13.0/manual/renderer-features/how-to-fullscreen-blit-in-xr-spi.html
但最新版本中这一实现直接被 Blitter 类封装,因此直接使用 Blitter 就可以了。
3.4 Shader 的修改
注释写在下面代码中。
一定需要注意的是, Blitter 类 会默认把输入图叫做 _BiltTexture,而不是 builtin 管线中的 _MainTex, 因此代码中一定要确认引用/声明是对应的。
1 | // 如果这是一个 Blit Shader,建议直接 include 这个 |
4. Profile 的正确姿势
Unity Profiler 只能看到主线程和渲染线程 CPU 上的开销,但大部分时候可能瓶颈来在于 GPU。
对于 Quest 设备,最好的方式就是使用 Meta 官方魔改的 Renderdoc 版本
https://developer.oculus.com/blog/graphics-optimization-renderdoc-meta-fork/

能看到每个步骤时间的信息和 tile 的信息,完美。
不过受制于机能限制,后处理还是比较吃性能。
Quest3 渲染分辨率 1680x1760x2,做到 72fps 需要渲染 13ms 以内,但一个全屏 Blit 就能搞出去 1ms,实在是没有太多的空间。
5. 总结
当然,一般情况下就用 URP 原生的后处理就足够了,只有极少情况需要自己写后处理吧。如果需要的话,以上是一些踩坑经验,希望对读者有帮助。
参考资料
Single Pass Stereo: is it worth it?
Single Pass Stereo: a study – Learning by creating (iliaskapouranis.com)
官方论坛吐槽贴:XR 里到底怎么 Blit CommandBuffer.Blit in VR/XR - Unity Engine - Unity Discussions
官方文档建议如何 blit URP blit best practices | Universal RP | 15.0.7 (unity3d.com)
RTHandle 的文档 The RTHandle system | Core RP Library | 15.0.7 (unity3d.com)
CoreUtils.SetRenderTarget 的文档 Method SetRenderTarget
| Core RP Library | 15.0.7
Blitter 的文档 Class Blitter | Core RP Library | 15.0.7 (unity3d.com)